Automation Add-On
Intrduction and overview to my Automation Add-On app for Flows.
With the Summer ‘24 Release, Salesforce has introduced the Automation Lightning App
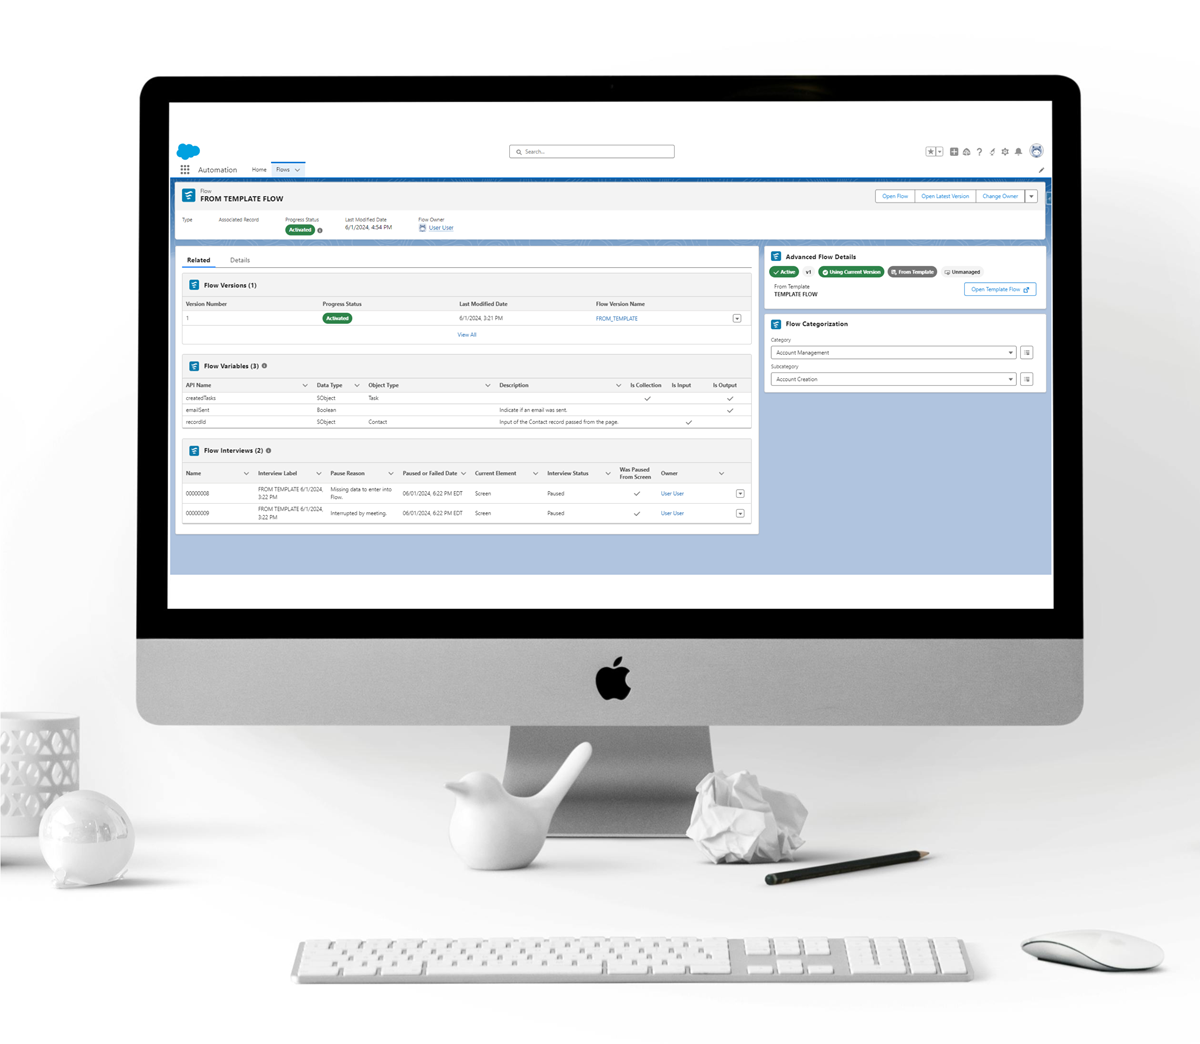
View and monitor your flows in the Automation Lightning app, which is now available to all flow admins and other users that you grant access to. From the app, you can create flows or open any flow that you have permission to access in Flow Builder. New list views show your most recently modified flows and flow definitions that include errors. Search for flows using a keyword in the flow label. Filter or sort flows by type, progress status, last modified date, last modifying user, and associated record fields. Additionally, find a direct link to the Trailblazer Community and to relevant learning material on Trailhead.
Bringing Flows outside of Setup has been a personal project of mine ever since I learned you can do a SOQL query to get Flow related data:
There are even more, plus there are a few new ones that are now accessible to most orgs as of Summer ‘24.
Introducing Automation Add-On
Since Salesforce beat me to the punch by exposing Flows outside of Setup, I have pivoted and released an suite of Lightning Web Components (LWCs) that will further enhance the Automation Lightning App.
- Advanced Details
- Schedule-Triggered Details
- Triggered Details (Record-Triggered and Platform Event-Triggered)
- Time-Based Monitoring (Scheduled Paths)
- Test Lists
- Variable List
- Paused Interview List
- Categorization
Components
Flow Advanced Details
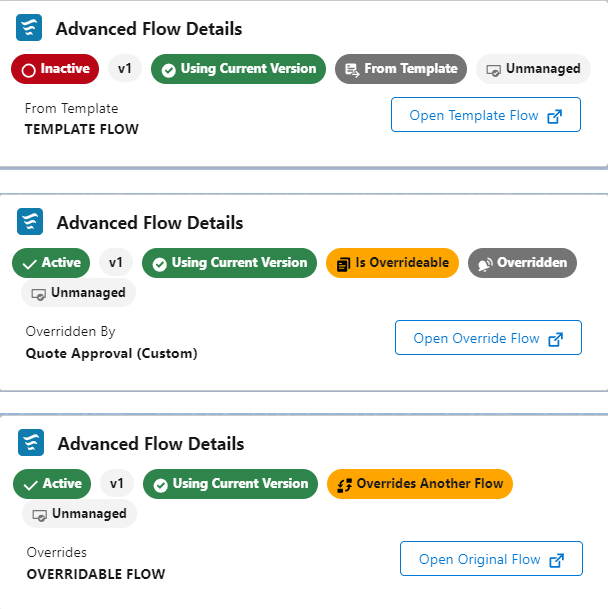
Flow Advanced Details displays about the state and conditions of the Flow.

Badge Types
Based on the state of the Flow, these are the badges that can appear:
![]()
Absolute Values:
- Status Badge
- Active: The Flow has an activated version
- Inactive: The Flow has no active version
- Version Badges
- Version Number
- Displays what is the most recent or currently active version number
- Current Version Status
- Using Current Version: The latest version is the one which would be used
If there is no active version of the Flow, this will always appear because it assumes the latest version is the one being developed or will be used
- Using an Older Version: When the active version is not the same as the latest version, this will appear to alert the user.
- Using Current Version: The latest version is the one which would be used
- Version Number
Conditional Values:
- Template-related Badges
- Is Template: The Flow version is designated as a template
- From Template: The Flow version is assigned to a template, likely from using that template to build the Flow
- Override-related Badges
- Is Overridable: The Flow version is designated as overridable
- Overridden: The Flow is actively being overridden by another Flow
- Overrides Another Flow: The Flow version indicates that it is being used to override another Flow which is overridable
- Async Badge
- Async Path: The Flow has an asynchronous path.
- Async Path: The Flow has an asynchronous path.
- Package State Badge
- Beta: Indicates that for a package org, the Flow is currently in a Beta release.
- Deleted: ??
- Deprecated: ??
- Deprecated Editable: ??
- Installed: Indicates the Flow is installed via a package.
- Installed Editable: Indicates the Flow is installed via a package and is editable.
- Released: Indicates that for a package org, the Flow is currently in a release.
- Unmanaged: Indicates that the Flow is not in nor from a package.
- Package Namespace Badge
- Provides the namespace prefix of the Flow if installed by a package with a namespace.
- This may seem redundant with the Installed package state badge, but some packages do not have namespaces.
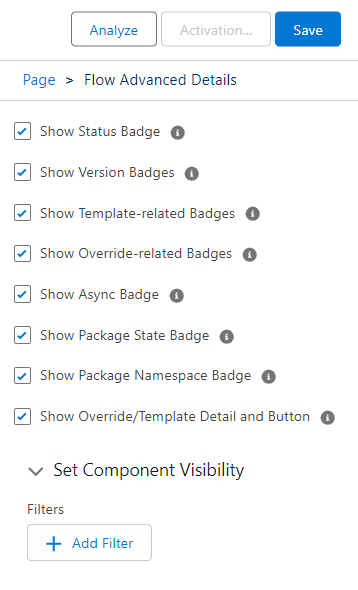
Each set of badges above can be shown or suppressed based on configuration via the property editor.
Open Source Flow Button
Flows from a template, being overridden, or overriding another Flow, the name of the source Flow and a button to open it in a new browser tab can be shown or suppressed based on configuration via the same property editor.
Flow Schedule Details
Flow Schedule Details displays details about the schedule and settings. This LWC will only render if the Flow is a Schedule-Triggered Flow. “Launches at a specified time and frequency for each record in a batch. This autolaunched flow runs in the background.”
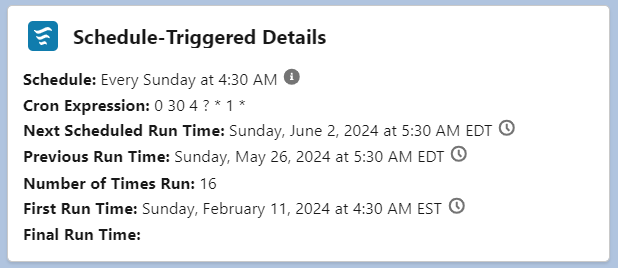
Help text tips have been added to indicate to the user that the Schedule is in the org’s timezone, and that timezone is displayed when hovering over the tool tip.
The Run Times are in the user’s timezone, but hovering over the tooltip will display the org’s time.
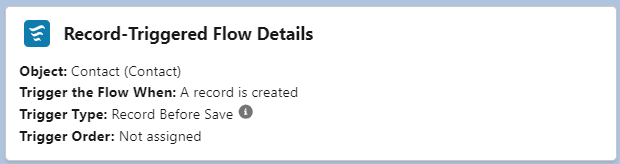
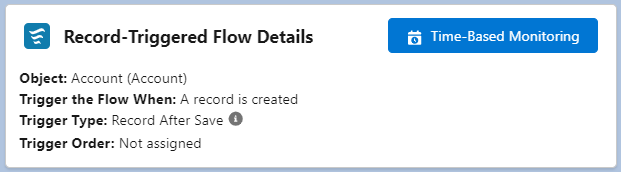
Flow Trigger Details
Flow Trigger Details displays information about the triggering event (Platform- or Record- Triggered). This LWC will only render if the Flow is a Schedule-Triggered Flow.
For Platform Event-Triggered Flows, it appears like this:

For Record-Triggered Flows, it appears like this:
For Record-Triggered Flow, it is also possible to display a button to open a pop-up modal for monitoring time-based Flow interviews. This button can be shown or suppressed based on configuration via the property editor.
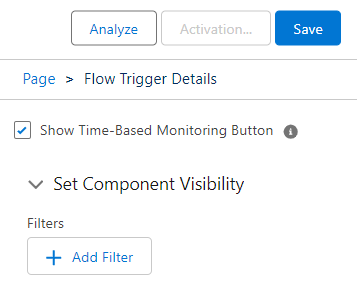
The button will appear as follows:
When clicked, it will launch the Time-Based Workflow page from Setup. There is no way to query these records, so in the spirit of this App, the Setup page is brought to the user and pre-populated with the search fields related to the Flow record.
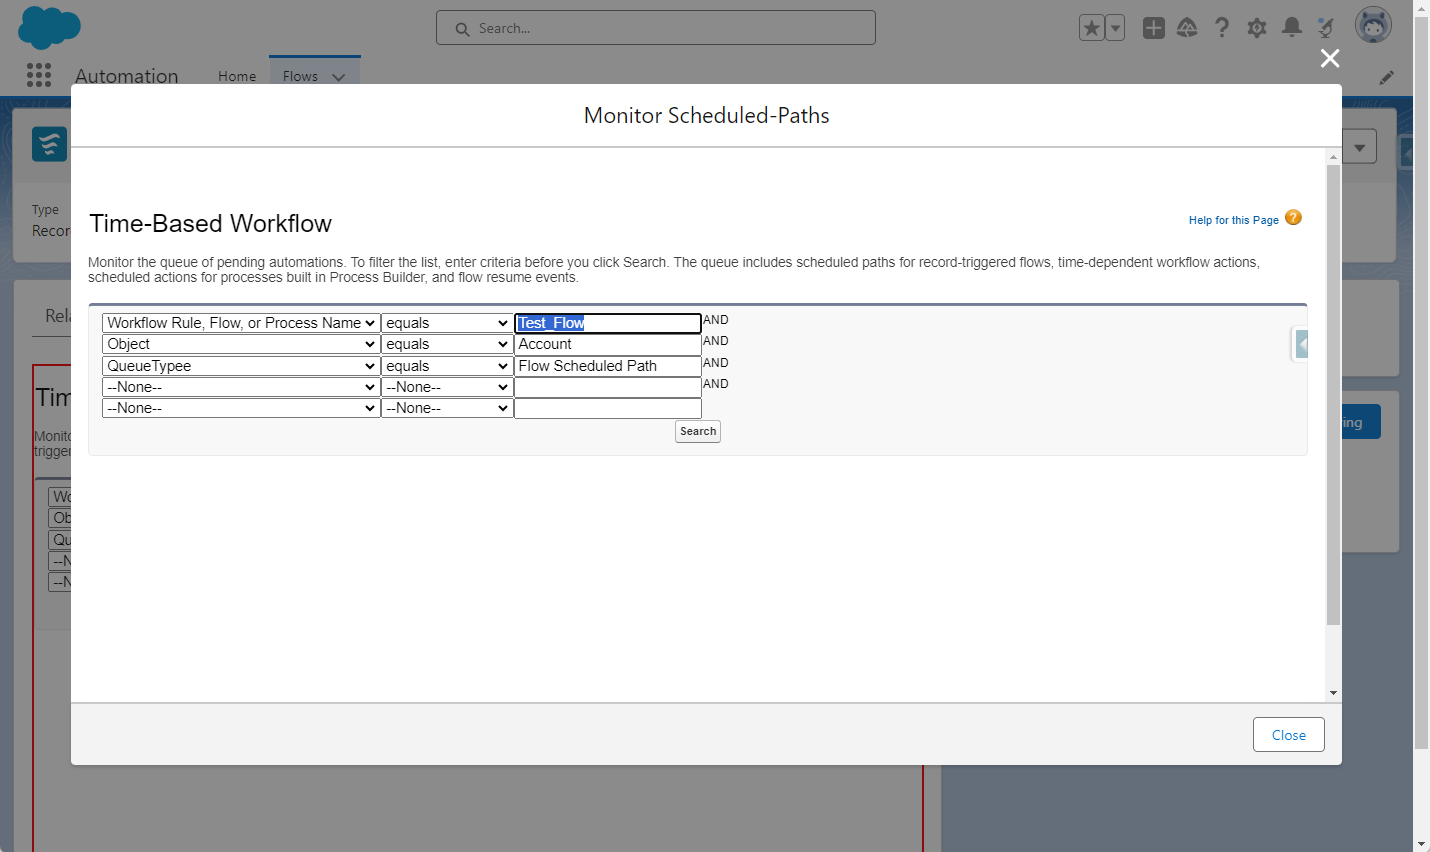
Flow Time-Based Monitoring
Flow Time-Based Monitoring displays the Time-Based Workflow page from Setup. There is no way to query these records, so in the spirit of this App, the Setup page is brought to the user and pre-populated with the search fields related to the Flow record.
This component is used in the pop-up modal launched by the Record-Triggered button for time-based monitoring, so there is no need to use both.
You’ll notice in the image below, we added a new tab on the page layout for this component. With Summer ‘24, you can also make these tabs conditionally displayed and you may want to explore that.
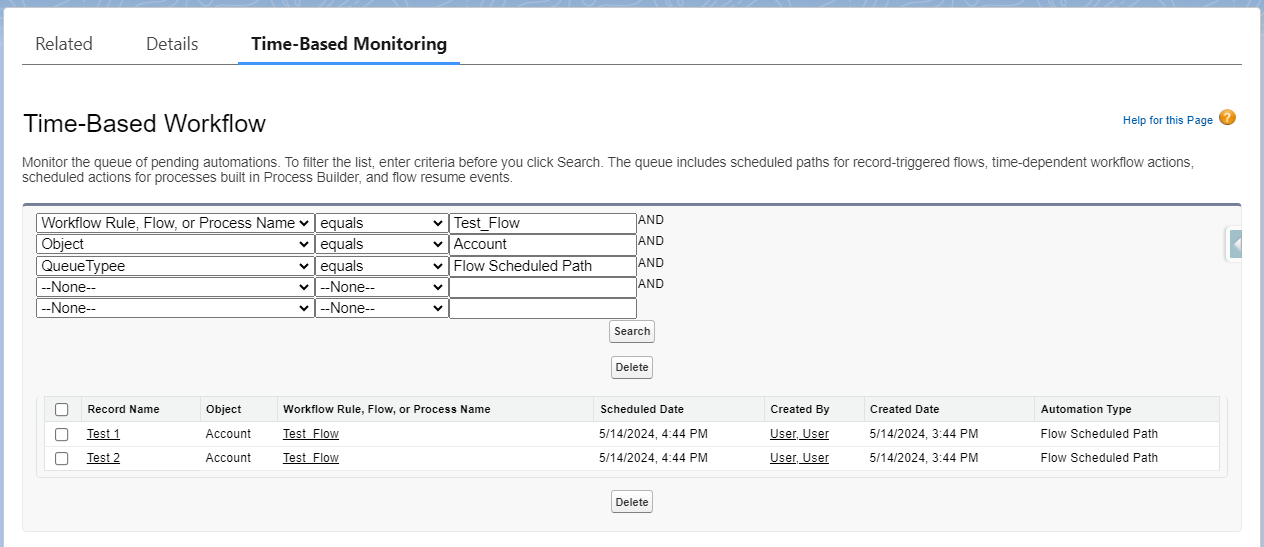
This component is only utilized for record-triggered Flow and will display a message if the Flow is not relevant to this component.

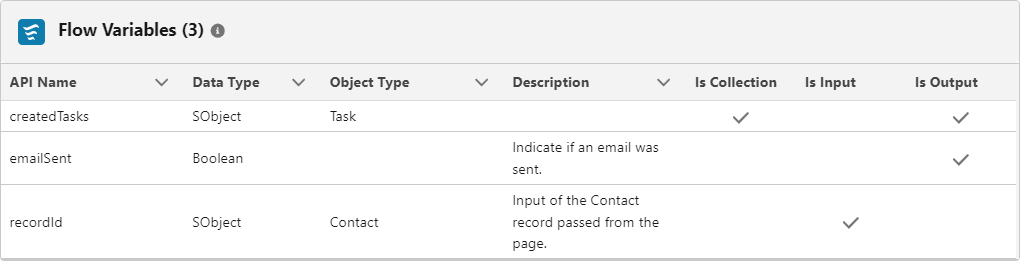
Flow Variables List
Flow Variables List displays a list of all input/output variables. Help text will remind users that it’s only these types of variables that are displayed.
Reminder: Only input and output variables will be shown.
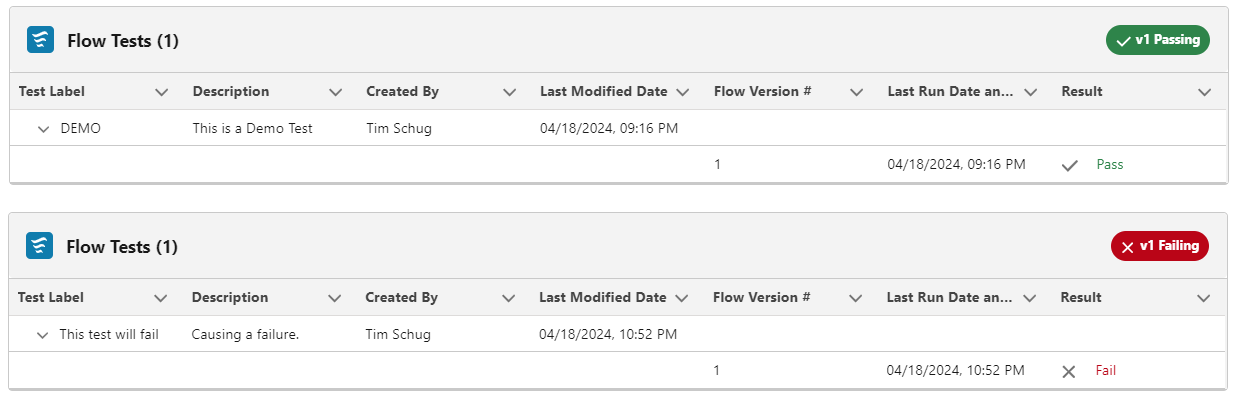
Flow Tests List
Flow Tests List displays the status of Flow Tests for the current version. This LWC will only render if the Flow has Flow Tests, which is currently limited to certain record-triggered flows.

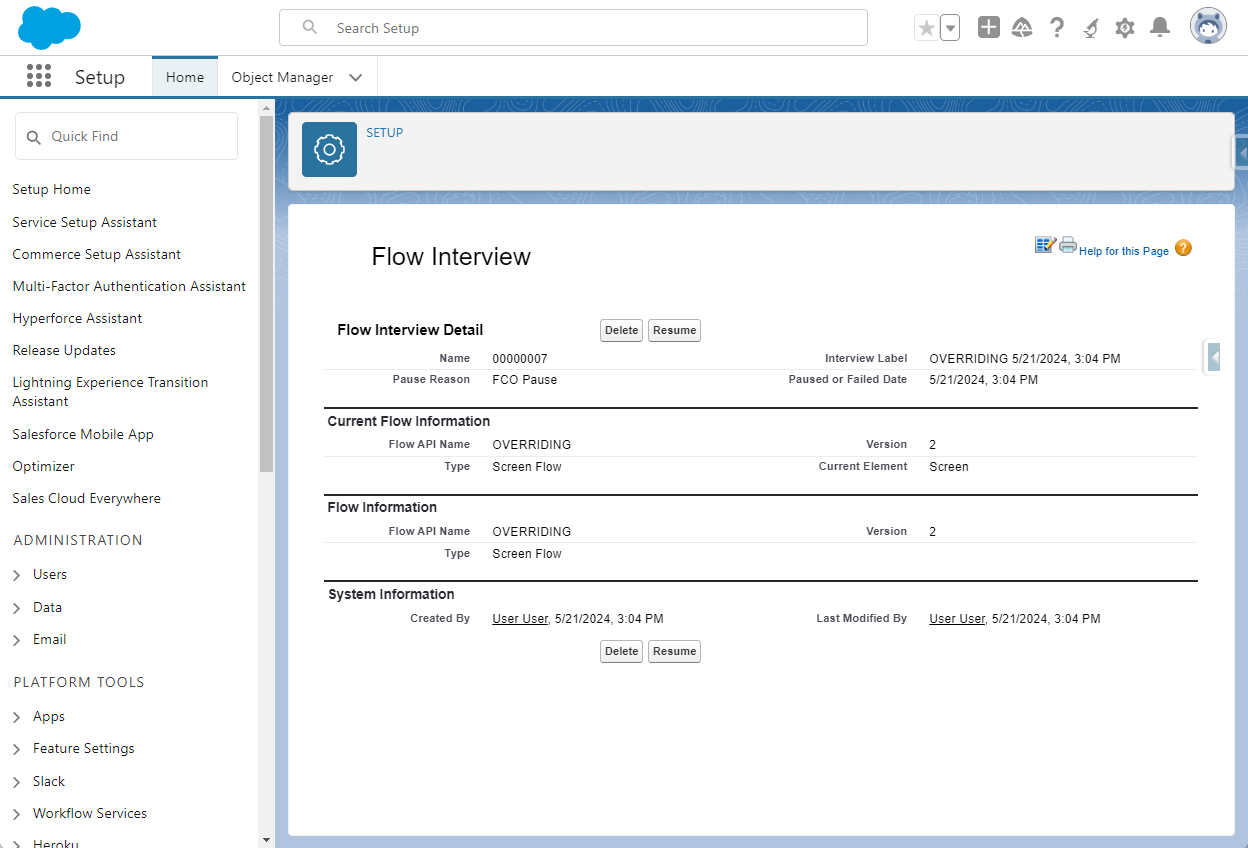
Flow (Paused) Interviews List
Flow Interviews List displays any existing Flow interviews in a Paused state. This tries to closely mimic what is seen in Setup for the Paused and Failed Flow Interviews.
Users will be able to use a row action to select from two options which will open a new tab.
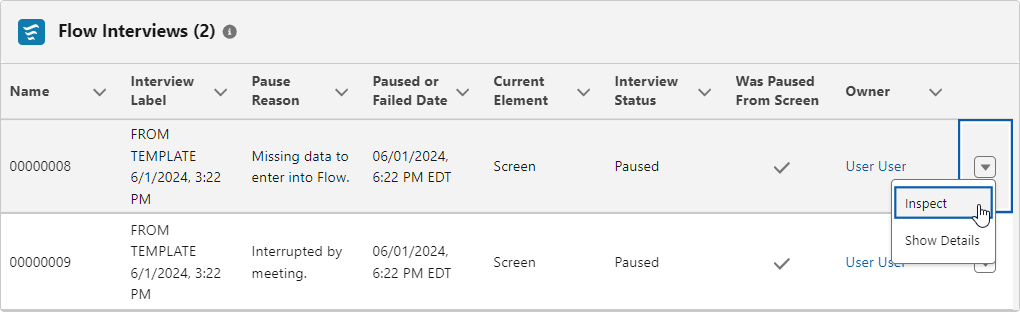
- Inspect - will open a tab that shows the current position of the paused Flow on the Flow Builder Canvas, along with its Debug Details.
This is helpful to see exactly where the paused Flow is at in a process.

- Show Details - will open a tab that navigates directly to the Flow Interview page in setup, as if the user navigated to it directly from the Paused and Failed Interviews page. This allows the user to either delete the paused Flow or resume it.
It was attempted to embed this page inside of a modal like the Time-Based Monitoring; however, the Setup page does not behave correctly when outside of Setup, regardless of if it is in a modal, iframe, or by itself. Until this is resolved, direct navigation to Setup is the best option.
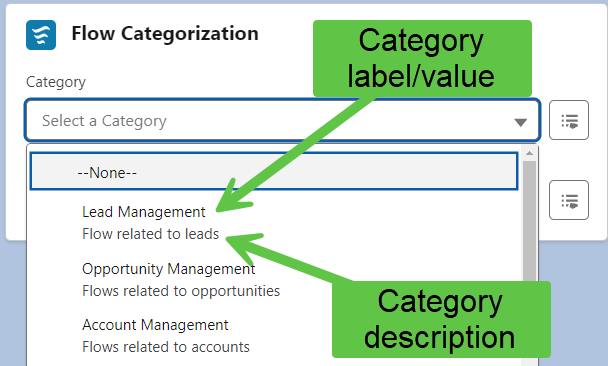
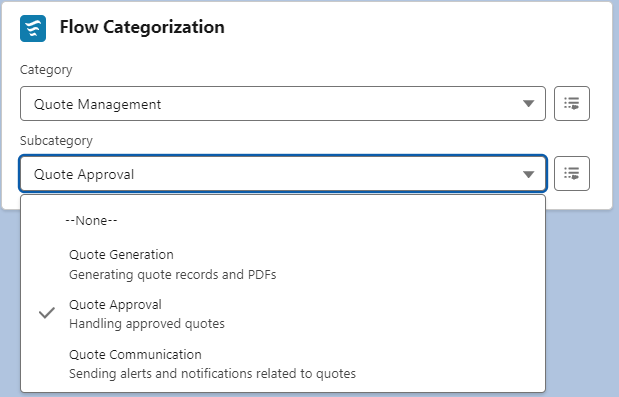
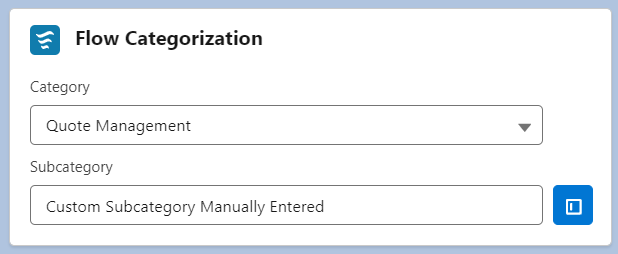
Flow Categorization
Flow Categorization is a special component to enable users to easily access and manage (even control) the Category and Subcategory text fields on the Flow record.
This component can be a challenge to understand, but once it’s been used once or twice, it’s fairly easy to comprehend (and greatly appreciated).
Through the relatively easy configuration of a special delimited file (such as a CSV or comma-separated-variable file) stored as a Static Resource, the users will be shown a custom set of dependent picklists. The category options are actually a set of labels/values and optional descriptions.
See how the special delimiters are configured and how to access the packaged example.
The component can be configured with a few options:

- Show Card Header
This allows the LWC’s card header to appear or not. This is because the component was designed intentionally so that it could fit in the Lighting Page Layout to appear as if it’s part of the page. More detail to replace the entire page was not built until feedback is received and more is learned about the Flow record object.
- Always Allow Manual Entry
The component has been intentionally designed to support the underlying factor that the data is saved in text fields and not picklists. As such, if the existing value in either field does not match the configured values for the picklists, the input is rendered as a manual text entry to ensure this “backwards” compatibility. This manual text entry can be always enabled or only used when necessary as designated above. Ideally, the desired values are configured and only picklists are shown to the users.
- Category File Name
This is the API name of the Static Resource so that the component can retrieve the contents of the special delimited file.
- Category File Namespace
It’s desired to provide a recommended set of Flow Categories based on feedback. In order to access any static resource in a namespace package and avoid duplicate issues, an optional namespace parameter has been added.
- Category File Delimiter
As mentioned, this is a special type of delimited file and the delimiter indicates how the individual options are separated.
- Category Value Splitter
This is the character/delimiter that separates the label/value from the optional description.
When the input mode supports both picklist and manual entry, a toggle is shown to the right of the input.
- The icon of a picklist with a cloud designates that a picklist is being presented.
- The icon of a text input field in blue designates that the input is in manual entry mode.
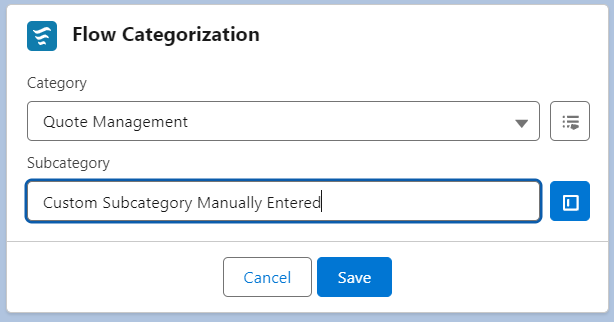
In the image below, always allowing manual entry has been disabled, but because the existing Subcategory does not meet the configured delimited input options, it is displayed in manual entry mode. Toggling the button to the right will display the allowed subcategories for the category.
When saving the categorization to the record, the component will attempt to save the data back to the record and the user will be informed if it was successful or failed.

When using this component, we recommend marking the fields on the Page Layout (different from Lightning Record Page) as read-only. The System Administrator will still have edit acces, but others should not.
To access the Page Layout, you cannot do this from Setup -> Object Manager like normal Salesforce objects. Instead, you must follow these steps:
- Navigate to the
Automationapp from the App Launcher- Select the
Flowstab- Click the
Setupgear in the upper right corner, ans selectEdit Object- You now have access to the
FlowRecordin Object Manager- Select
Page Layouts- Click on
Flow Layout- Find the Category field, then when your cursor is hovering over the field, select the wrench icon 🔧 to edit the properties
- Check the box for
Read-Onlyand click OK- Repeat this process for the Subcategory field
- Click the Save button
Known Glitch: If you remove the fields from the Page Layout, there is often a “refresh” issue that makes the component not reflect the changed values. That’s why we offer the recommendation above, rather than removing them from the Page Layout.
We are also aware that there is behavior where Subcategory can be manually entered without a Category and this can create a confusing user interface loop when trying to clear the value if setting it to Picklist mode.
Setup
Build a Lightning Record Page
Using the Lighting App Builder is another option for managing pages. See the Salesforce Help Docs: Lightning App Builder for more information.
Click the Setup gear in the upper righthand corner and select Setup
Search for
Lightning App Builderin the Quick Find.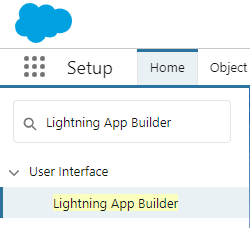
Click
Newto build an entirely new page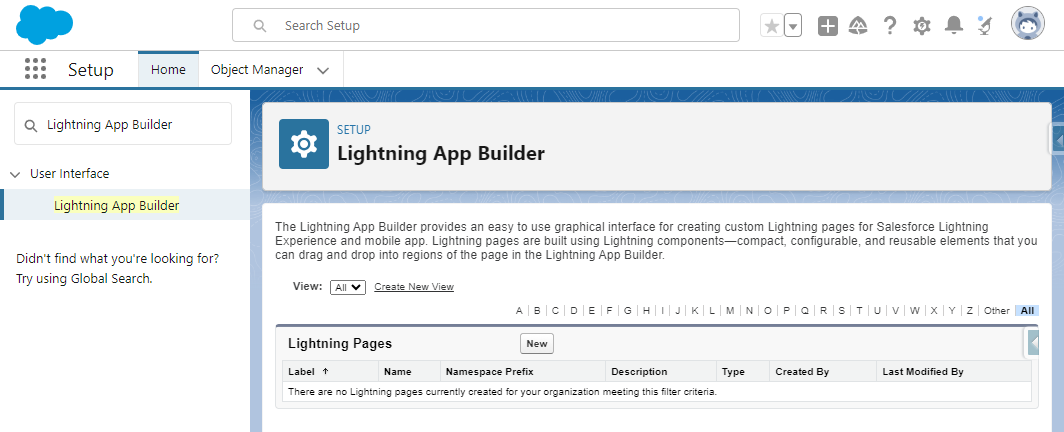
Select
Record Pageand clickNext.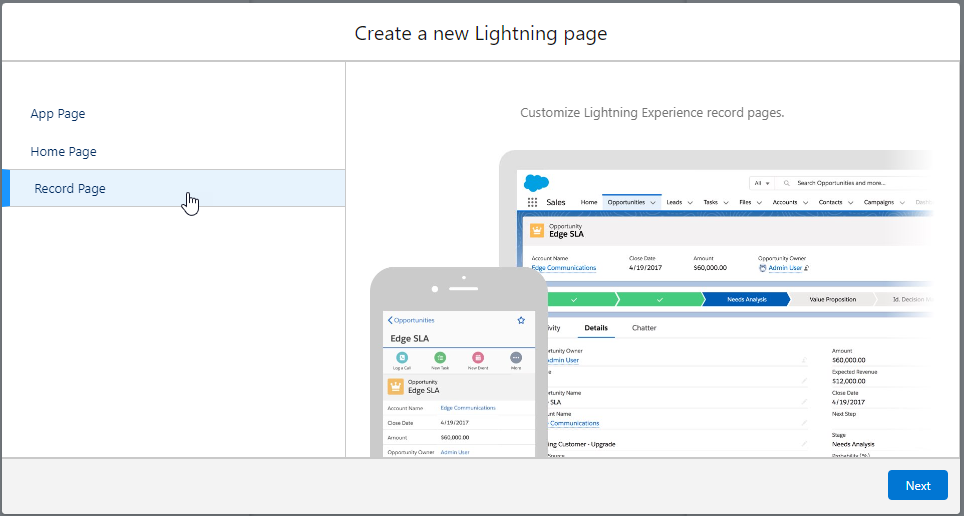
Provide a Label and select the object as
Flow (FlowRecord), then clickNext.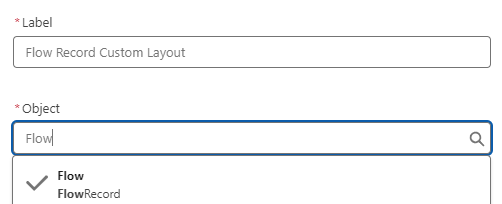
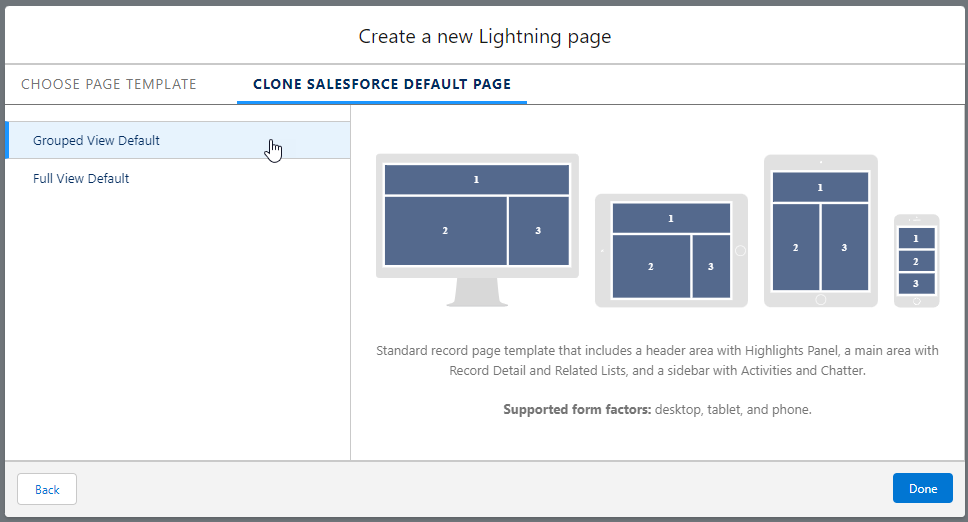
Select the desired
Page TemplateorClone a Salesforceand then click Done.Recommendation: Clone Salesforce Default Page -> Grouped View Default
Located the
Custom - Managedcomponents on the left hand menu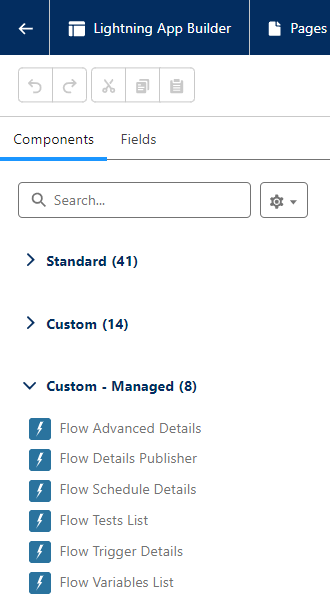
Drag the components onto the page.
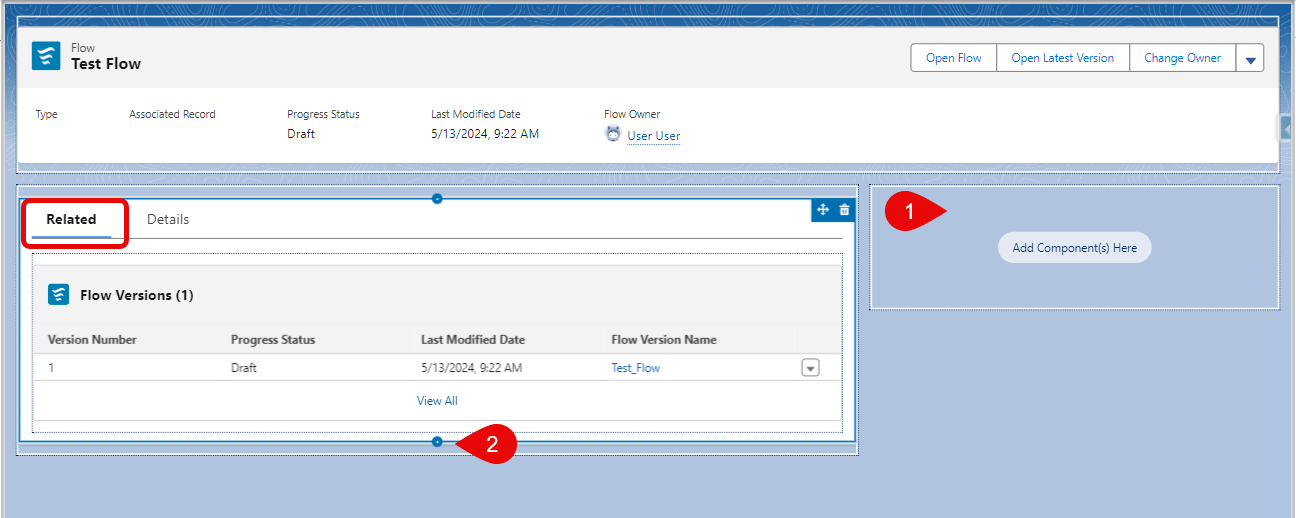
First add the
Flow Details Publisher.This MUST be located on the “outer” area of the page layout canvas. It must not be located on any tabs on the page.
This LWC will send the other LWCs the data needed for them to render correctly.
Then drag the other desired LWCs wherever you want them to appear, our recommendations are below:
- Right column
- Flow Classification (See tip below)
- Flow Advanced Details
- Flow Schedule Details
- Flow Trigger Details
- Flow Details Publisher (Required)
- Related tab, under the
Flow Versionsrelated list.- Flow Tests List
- Flow Variables List
- Flow Interviews List
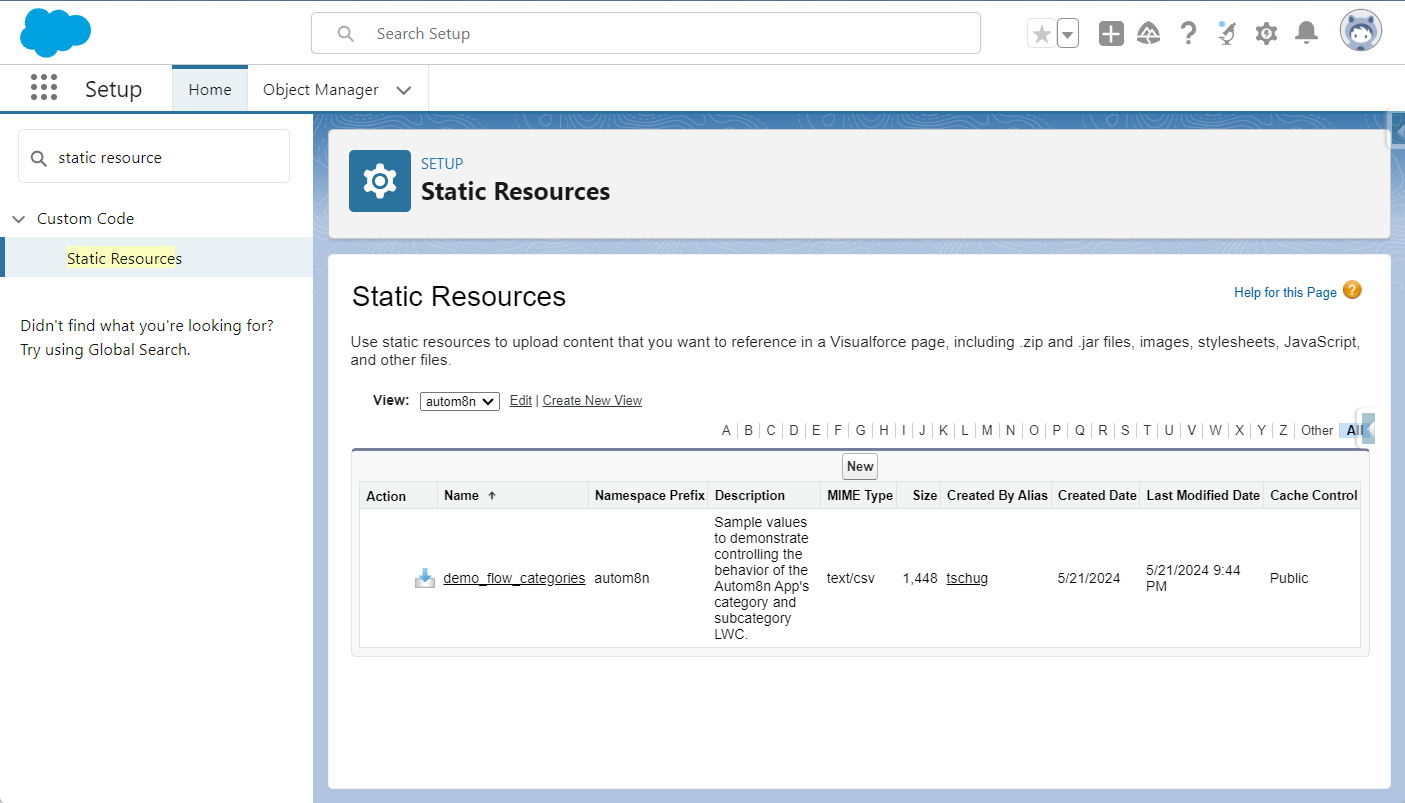
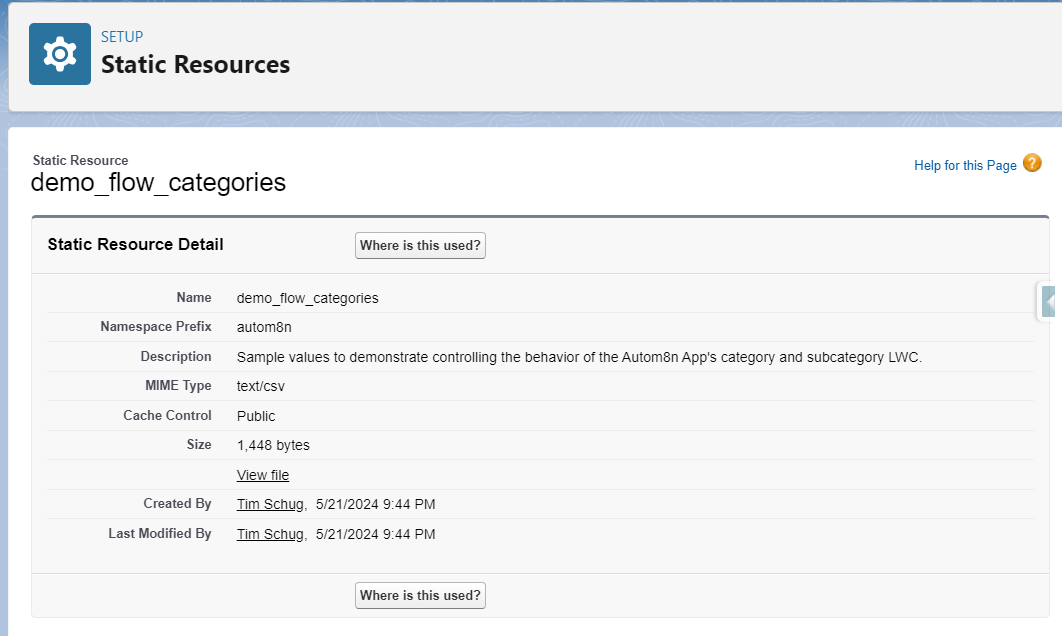
For the Flow Categorization LWC, we recommend first reviewing the component by using the included demonstration file with sample categories and subcategories. You can use it by setting the following values:
- Category File Name:
demo_flow_categories- Category File Namespace:
autom8n- Category File Delimiter:
,(it should default to this comma character)- Category Value Splitter:
:(it should default to this colon character) See the screenshot above in the Components: Flow Categorization section if you need help understanding the configuration.📢 Also when using this component, we recommend making the fields on the Page Layout (different from Lightning Record Page) as read-only.
Save the page.
Activate as needed. See the Salesforce Help Docs: Activate Lightning Experience Record Pages for more details.
Configure Categorization Picklist Options
Once you understand how the Flow Categorization LWC works, you can upload your own file as a Static Resource and configure the component as described above by setting the appropriate properties.
You can download our sample categorization file if you’d like to review. See Delimited File Structure for find it and for details on how to build your own file.
Delimited File Structure
The delimited file is special in that it actually has two delimiters. The structure of the file is as follows:
- The first column, or the first “value” in a row, is for the Category options, while all other columns are for the Subcategory options that depend on that Category.
- These are separated by the
Delimiter - Options mean:
- the label displayed and value assigned to the Flow’s category or subcategory field
- (optional) a description to appear in the picklist under the label/value to give users more clarity on why or why not it should be used
- Options are separated by the
Splitterto “split” the label/value from its description
Example:
- Delimiter is a comma
- Splitter is a colon
Category 1: Description of the first category, Subcategory 1A: Description of 1A, Subcategory 1B: Description of 1B
Category 2 without description, Subcategory 2A without description, Subcategory 2B with no description
Category 3: With a description, Subcategory 3A without description, Subcategory 3B: This has a description
Category 4 without description, Subcategory 4A: This has a description, Subcategory 4B without description
It should be clear that it’s best to be as consistent as possible to not confused users, whether that means:
- All-or-no descriptions
- Only-category or only-subcategory descriptions
- Certain subcategories of a category have all-or-no descriptions
You can access the packaged sample by navigating in Setup to the Static Resources
Installation Info
- Sandbox & Scratch Orgs
- https://test.salesforce.com/packaging/installPackage.apexp?p0=04t3x000001S5QDAA0
- Production & Developer Edition Orgs
- https://login.salesforce.com/packaging/installPackage.apexp?p0=04t3x000001S5QDAA0
Uninstall Steps
If you followed the steps we’ve outlined here, it should be simple:
- Navigate to Setup
- In the Quick Find, search for
Lightning App Builderand select it - Find the Lightning Record Page you built
- Click on
Editnext to it - Deactiveate the page
- Click on
Activation - Click the appropriate
Remove as...(should be Org Default) - Follow the steps on the screen
- Click on
- Click the Lightning App Builder’s back arrow (top left)
- Find the Lightning Record Page (again)
- Click on
Delto delete it - Now uninstall the package
- In the Quick Find, search for
Installed Packages - Click
Uninstallnext to the Flow Automation Add-On package (autom8n) - Follow the steps
- In the Quick Find, search for