UnofficialSF Barcode Scanner Update
A small but mighty update to the UnofficialSF Barcode Scanner.

I was recently working on a prototype and wanted to showcase the power and flexibility of Salesforce and Flow. This specific idea was to be able to use the barcode scanner to not only perform its scann, but then populate a lookup input on the flow’s screen.
Thankfully the Unofficial SF folks, specifically Josh Dayment, already had the pieces needed without only one small change required.
Follow along! But first, why not see it in action?
Watch a Demo
In this demo, we’ll see two assets on a list view, and their respective QR codes. We then enter the screen flow where we can push the Scan Asset button to open our phone’s camera and capture a barcode. Through the power of Data Fetcher it will get that barcode’s related record id and populate a lookup, as well as showing the current status. We can them select a new status from a picklist and save the update. We repeat the process with another barcode and then click the Done Scanning button to commit all changes. We get our confirmation screen (with a debug message). Then we leave the flow and return to the related list, and you may have to slow down the video, but you’ll see those asset statuses change on the list view because the flow set new values for them.
Technical Change
If we geek out for a moment, the technical change was small but mighty.
We just needed to add two lines of code.
First, we imported the FlowAttributeChangeEvent from from lightning/flowSupport in JavaScript sot that we could inform the flow during runtime that a component property has changed.
Then, after the scan was captured, we needed to dispatch this event.
1
this.dispatchEvent(new FlowAttributeChangeEvent('scannedBarcode',this.scannedBarcode));
I tried to do this with the continuous scanning mode, but was unsuccessful. Smarter minds can try to figure this out for the rest of us.
Example of How to Use It
Background
I will say that my goal required another one of Josh’s handy tools, Data Fetcher, which you can find on the Salesforce AppExchange. This component allows flow designers to return records on a screen folow based on user interaction. In my case, that interaction happened to be scanning a barcode!
In Josh’s post on UnofficialSF covering the barcode scanner, he explains how to use a formula field to generate a barcode on a Salesforce record for it’s record id. I did the same thing, but I actually wanted to use an external id. That’s because, in my prior life working at a university, we had institutional barcodes for capital equipment which were branded to the institute, allegedly tamper proof, and they came already numbered, hence the external id.
In this case, I’m going to use the Assets object, which already has a Unique Identifer field Uuid (universally unique identifier) and I’ll fake a barcode formula for now.
1
2
3
4
5
IF(
ISBLANK( Uuid ),
NULL,
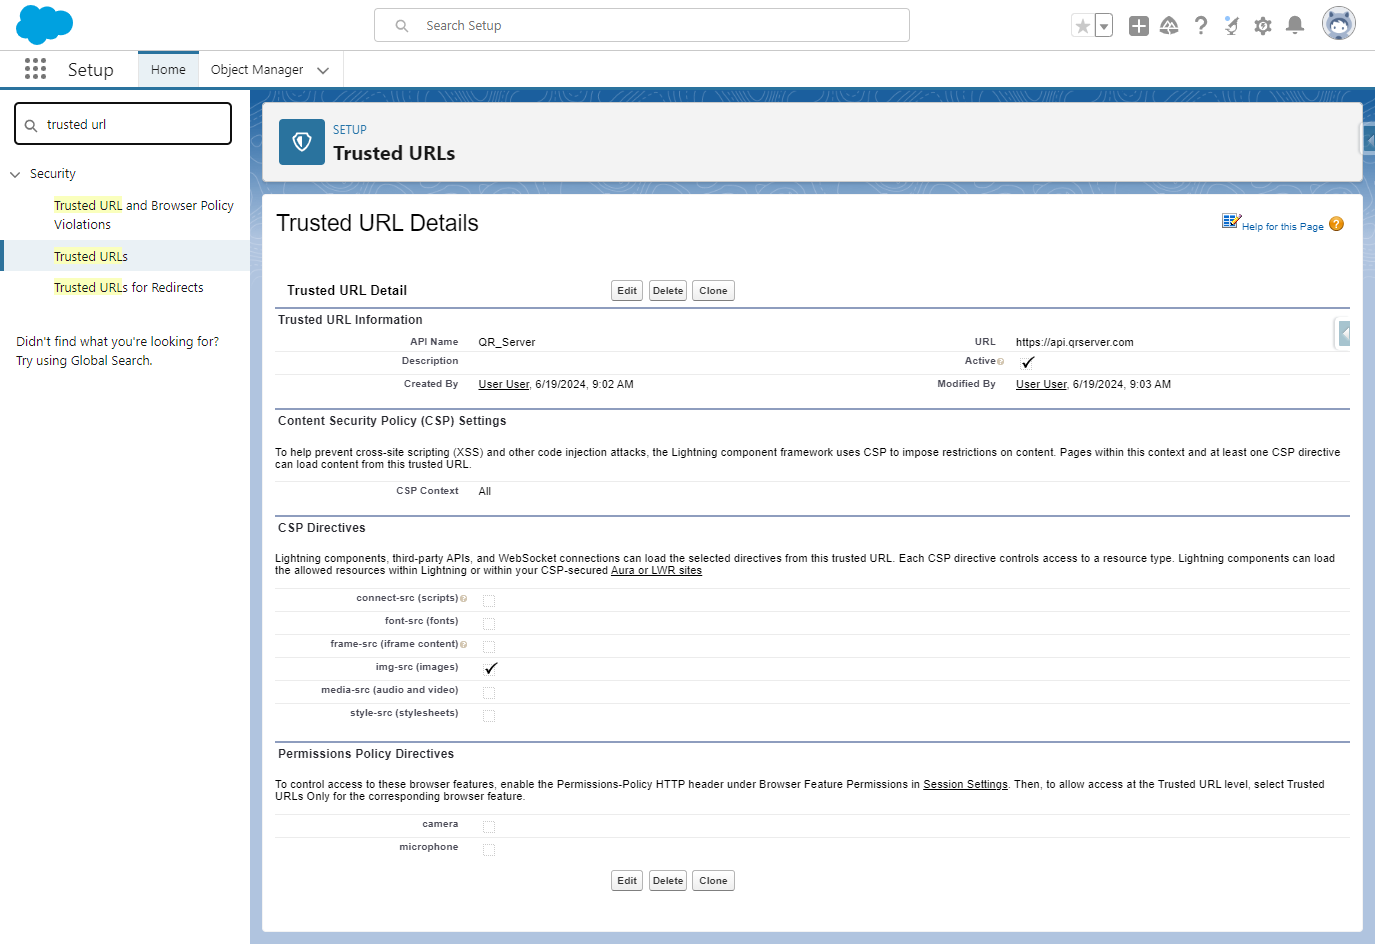
IMAGE( "https://api.qrserver.com/v1/create-qr-code/?size=150x150&data=" & Uuid, "Asset UUID" )
)
Just make sure you add a Trusted URL so Salesforce can render the QR code.
The Flow
To demonstrate how this can be done, let’s look at a simple flow I’ve setup.

Scanning Screen
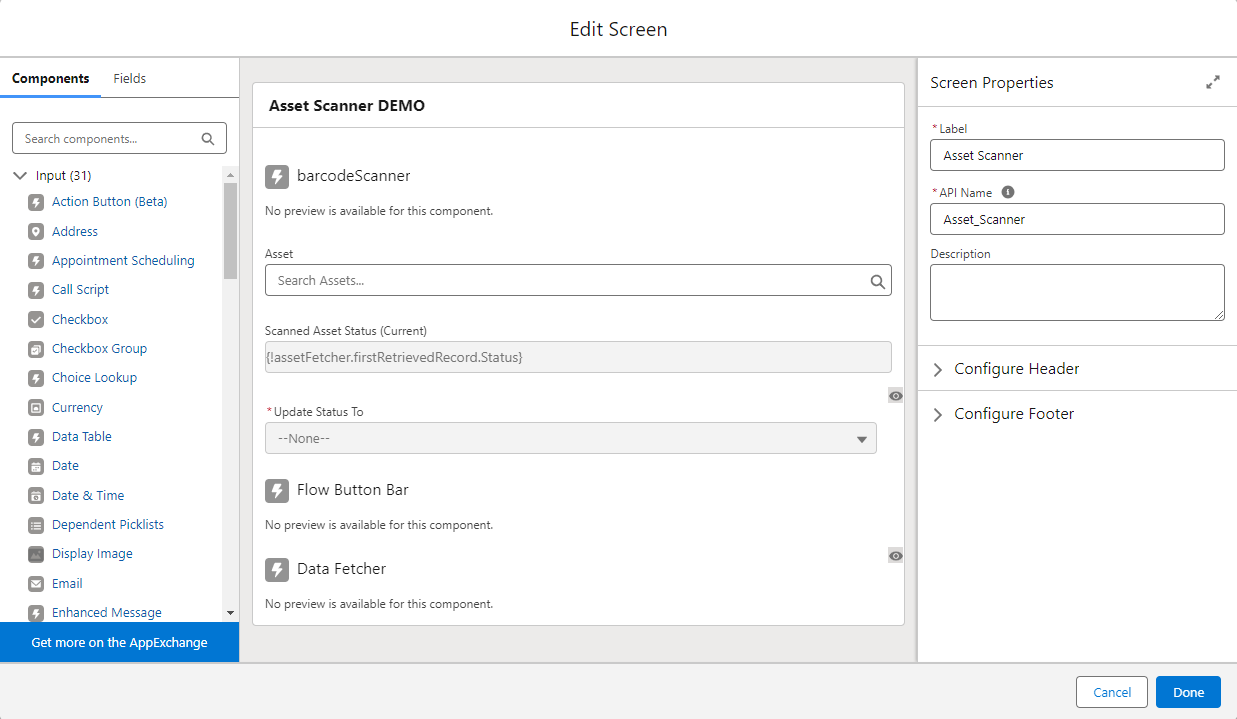
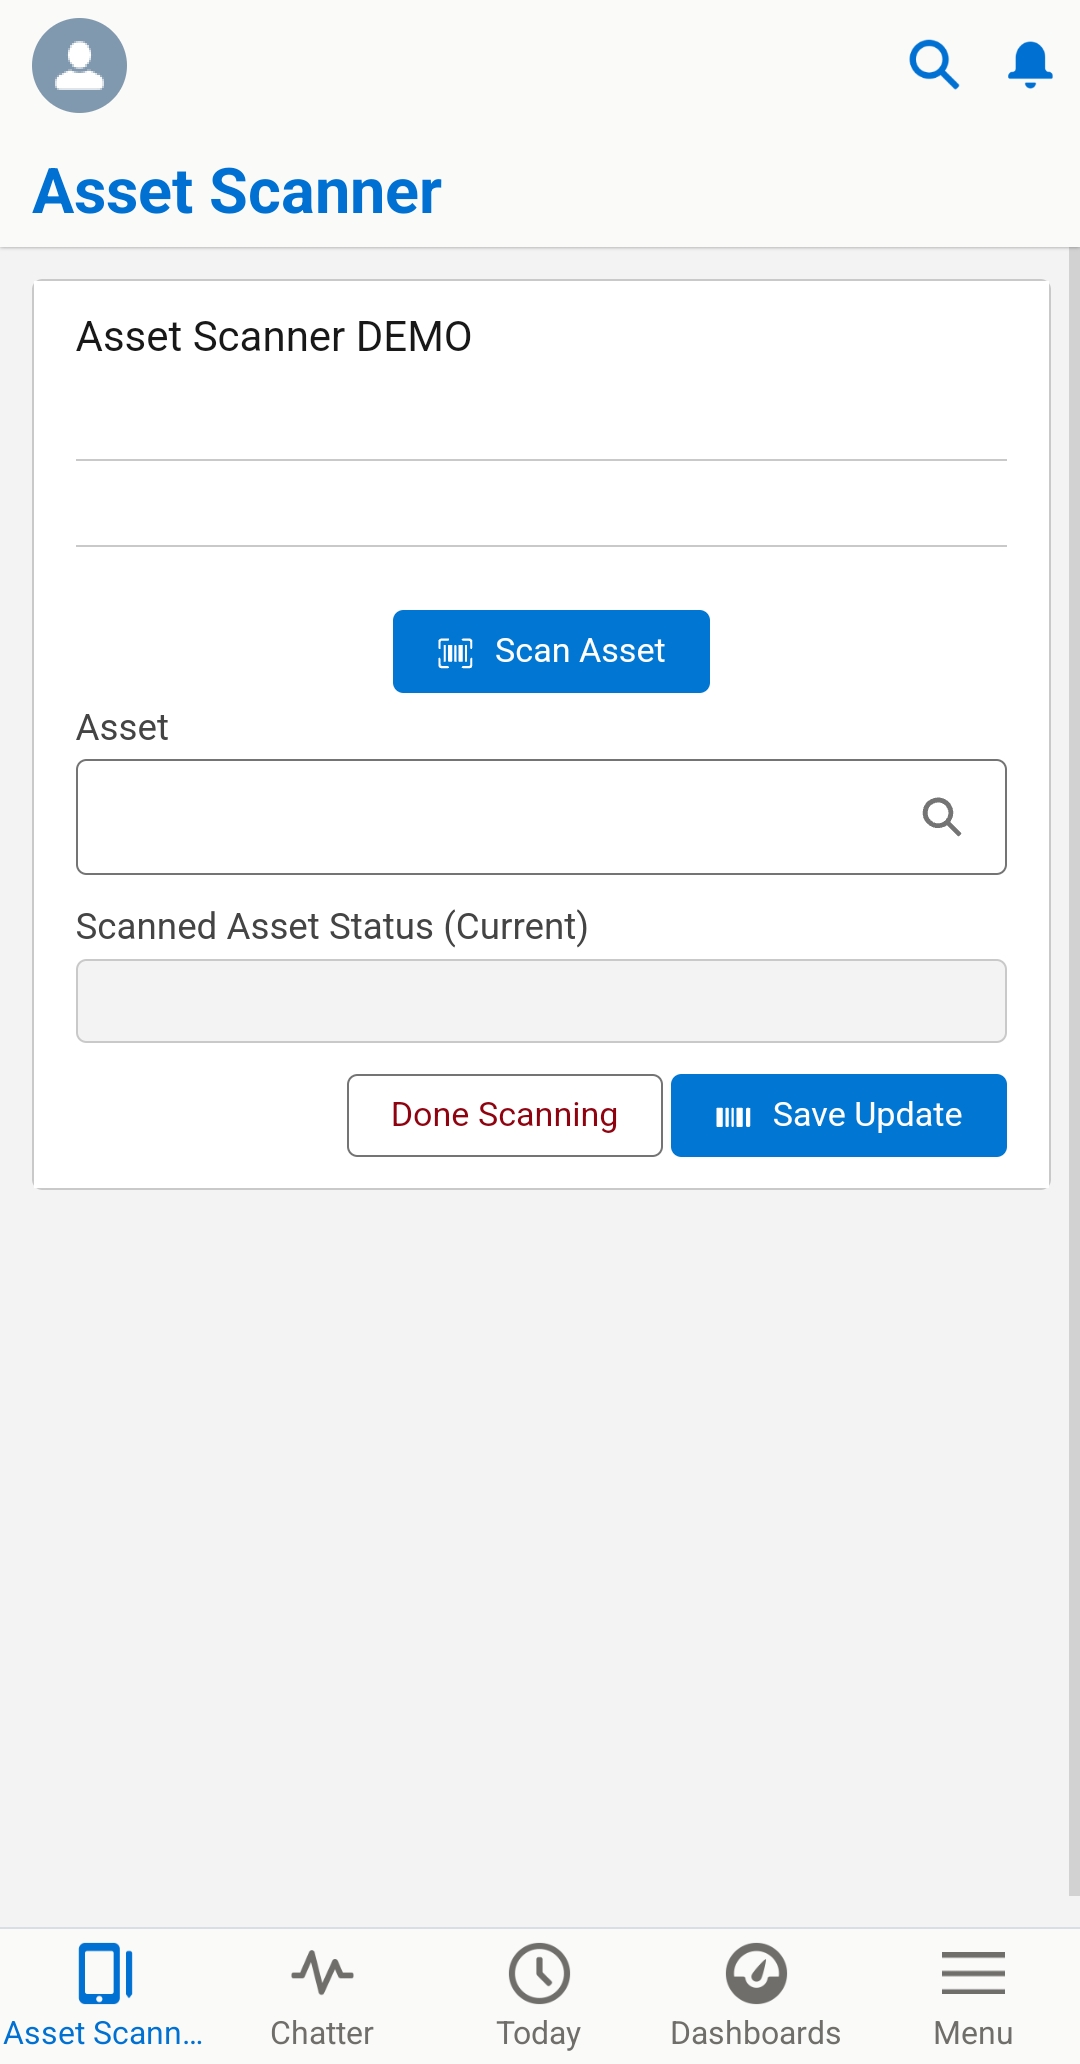
The bulk of the work is on the first screen, so we’ll focus heavily on it. It’s composed of:
- The barcode scanner
- A standard lookup input
- A standard text input (used to display the status of the scanned asset)
- A standard picklist to change the status of the asset
- The Unofficial SF Flow Button Bar (this is included with Unoffical SF Flow Base Packs )
- A Data Fetcher componet
How this works is that:
- The barcode scanner component will capture and store a value for anything that is scanned
- The value is NOW reactive thanks to the update
- This will then
- update a formula variable to define a SOQL query
- cause the Data Fetcher component to meet its conditional visibility requirement (shown later)
- Data fetcher will use this SOQL query from the formula variable and ideally return the result of a single asset record being found, because it’s matching on a unique identifer (no duplicates)
- The returned result will then be populated into the lookup field and should result in relating the lookup to the asset, as if the user manually searched for the record using the lookup
This is by design, so that if the barcode is unable to be scanned, the user can still use the flow to perform its intended purpose by searching for the asset.
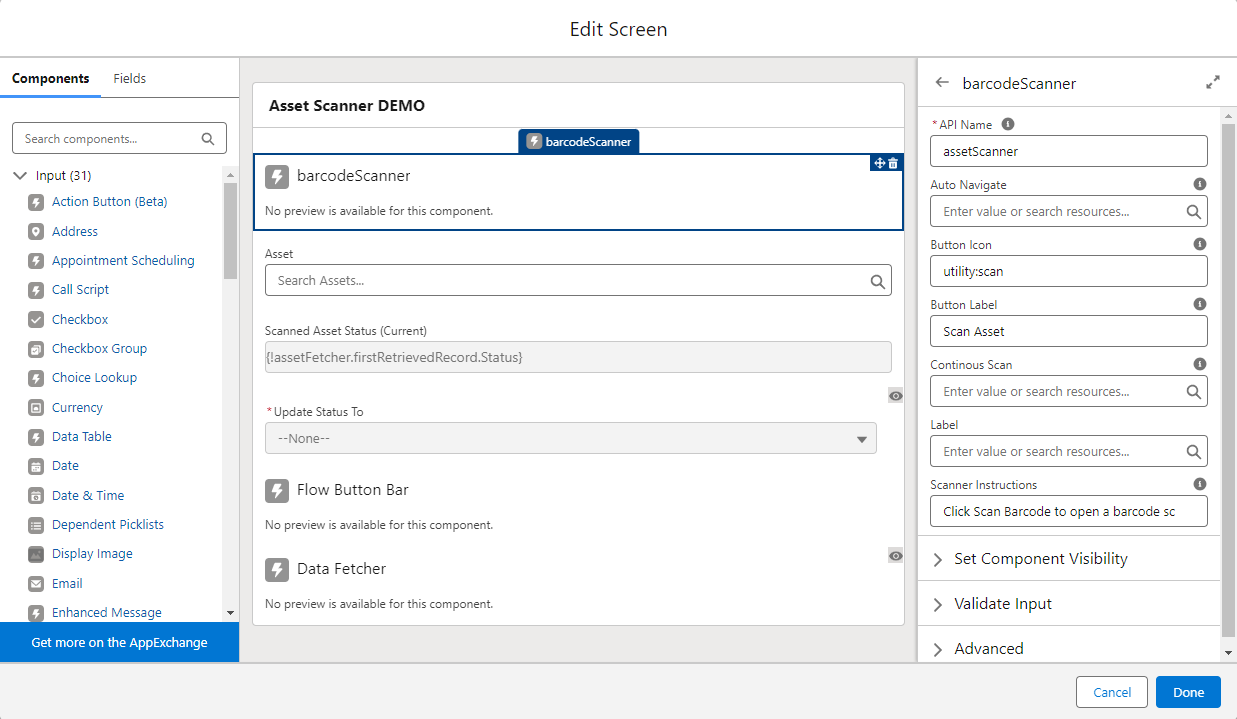 For the barcode scanner:
- API Name =
assetScanner - Button Icon =
utility:scane - Button Label =
Scan Asset - Scanner Instructions =
Click Scan Barcode to open a barcode scanner camera view. Position a barcode in the scanner view to scan it.
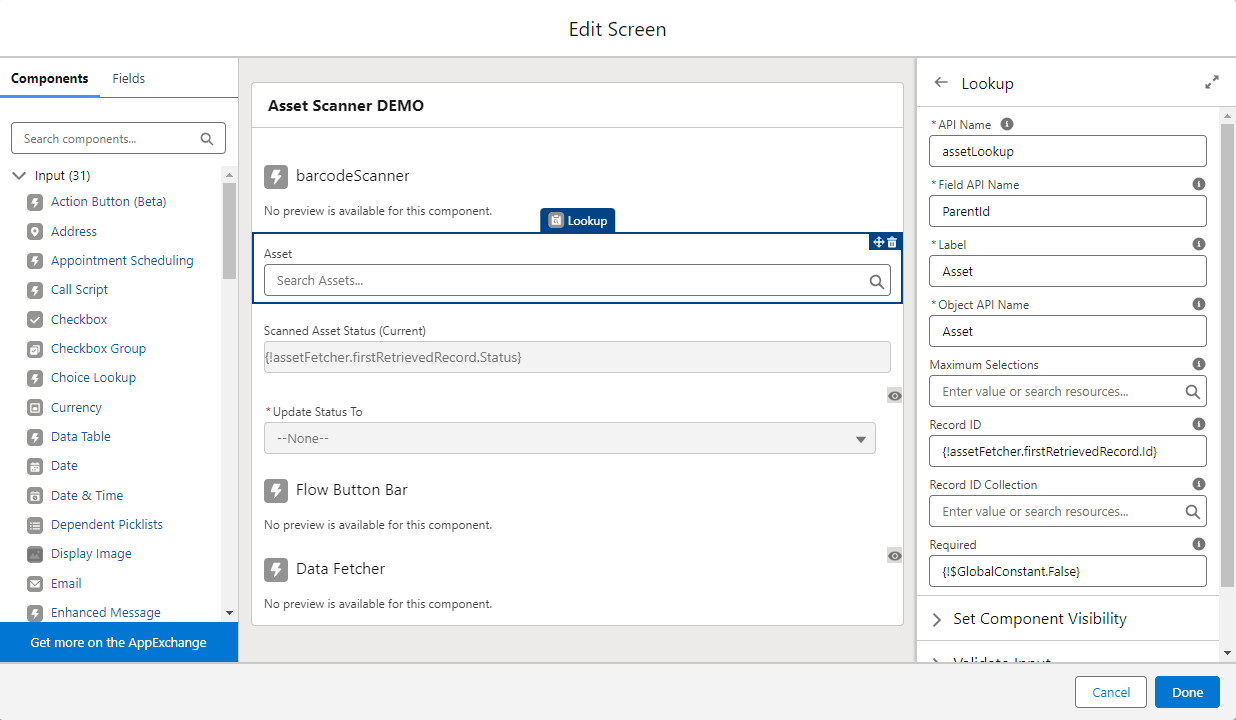 For the asset lookup:
- API Name =
assetLookup - Field API Name =
ParentId - Label =
Asset - Object API Name =
Asset - Record ID =
{!assetFetcher.firstRetrievedRecord.Id} - Required =
{!$GlobalConstant.False}
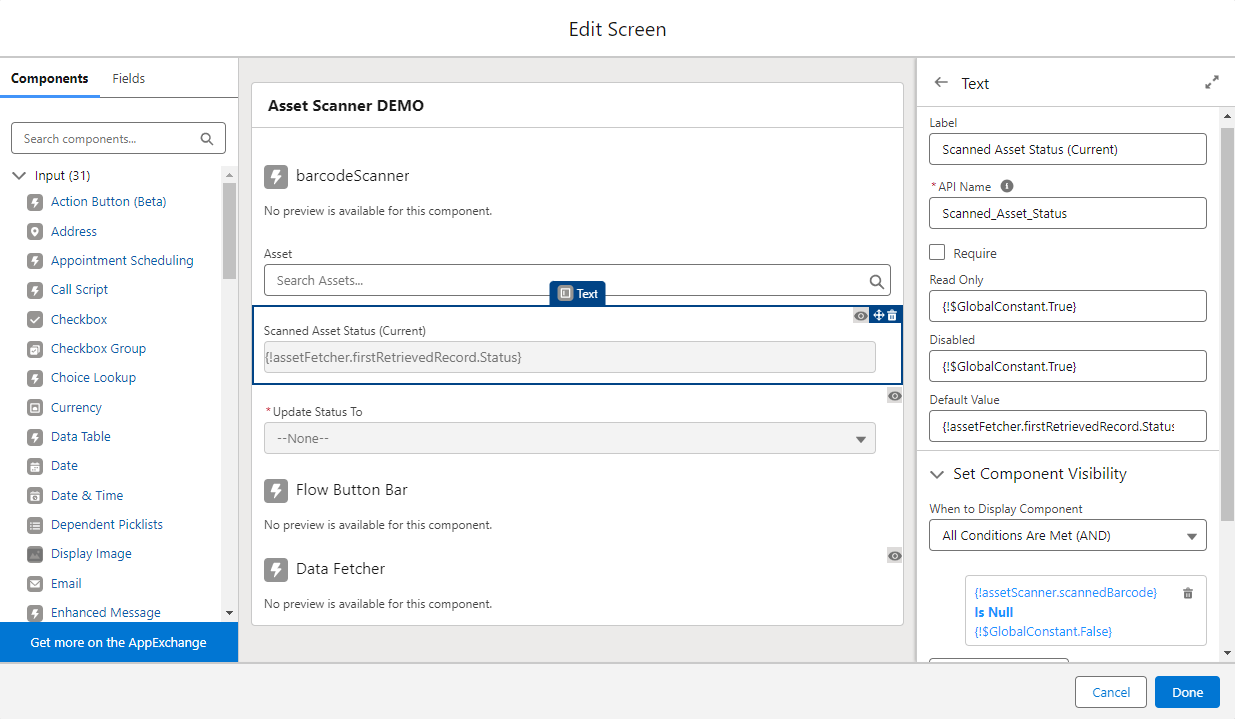 For the scanned asset status:
- Label =
Scanned Asset Status (Current) - API Name =
Scanned_Asset_Status - Read Only =
{!$GlobalConstant.True} - Disabled =
{!$GlobalConstant.True} - Default Value =
{!assetFetcher.firstRetrievedRecord.Status} - Set Component Visibility
- When to Display Component =
All Conditions Are Met (AND) - Condition:
{!assetScanner.scannedBarcode}Is Null{!$GlobalConstant.False}
- When to Display Component =
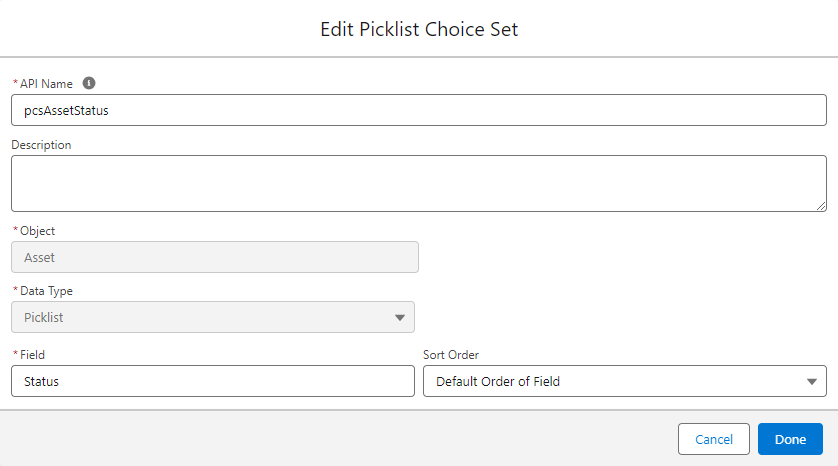
Create a new Picklist Choice Set resource defined as:
- API Name =
pcsAssetStatus- Object =
Asset- Data Type =
Picklist- Field =
Status
- Sort Order =
Default Order of Field
 For the update status to picklist:
- Label =
Update Status To - API Name =
StatusPicklist - Required = ☑️ (checked)
- Datatype =
Text - Let Users Select Multiple Options =
No - Component Type =
Picklist - Choice =
{!pcsAssetStatus}
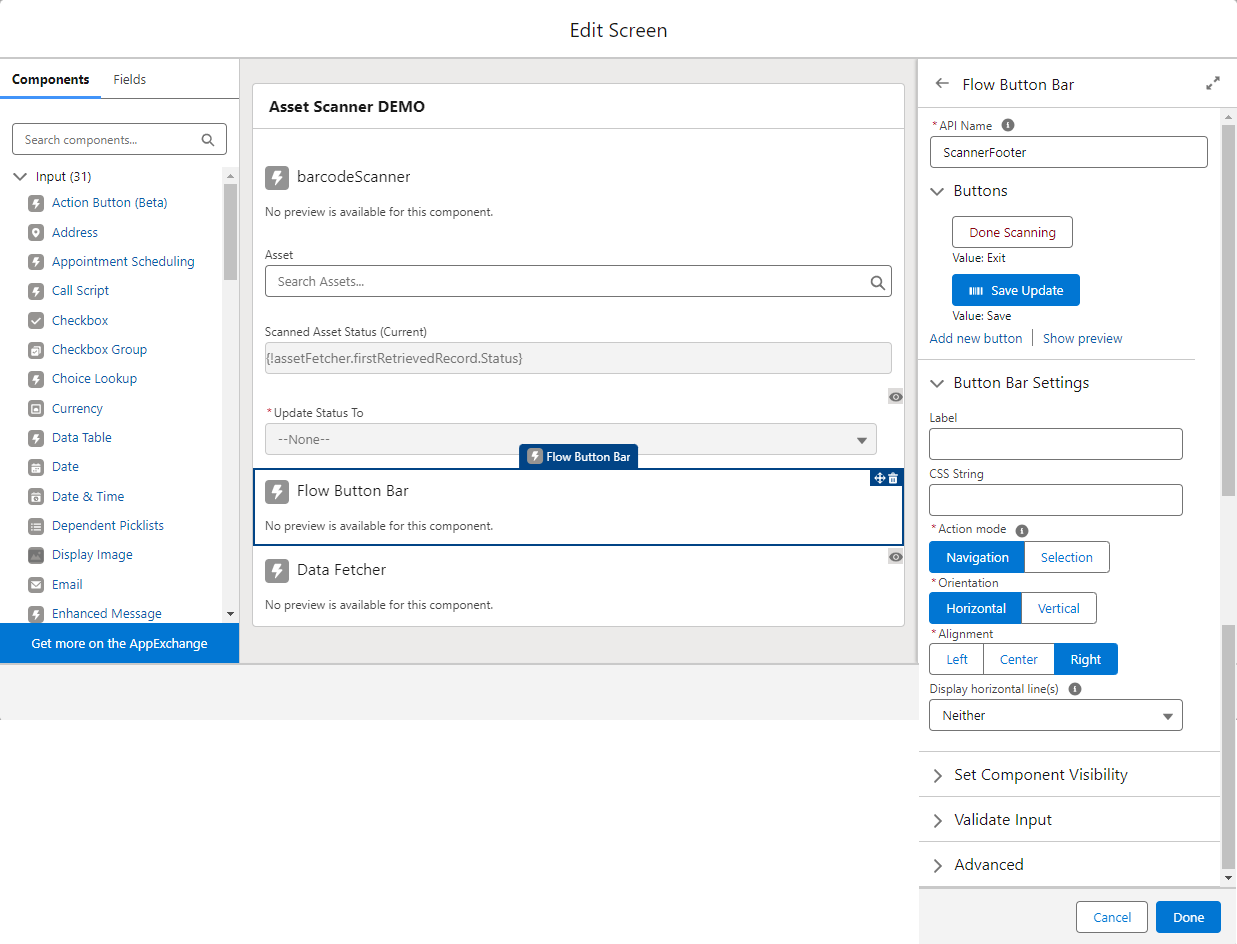 For the flow button bar: Design your buttons as you desire, I used:
- Button 1:
- Label =
Done Scanning - Value =
Exit - Variant =
Text Destructive Button
- Label =
- Button 2:
- Label =
Save Update - Value =
Save - Variant =
Brand - Icon Name =
utility:products - Icon Position =
Left
- Label =
- Action Mode =
Navigation(this is so it advances to the next screen) - Orientation =
Horizontal - Alignment =
Right - Display horizontal line(s) =
Neither
Special Note:
Since I chose to use the Flow Button Bar to navigate, I’ve actually set the screen’s footer to not be shown and instead use the
Done Scanningbutton that was configured.
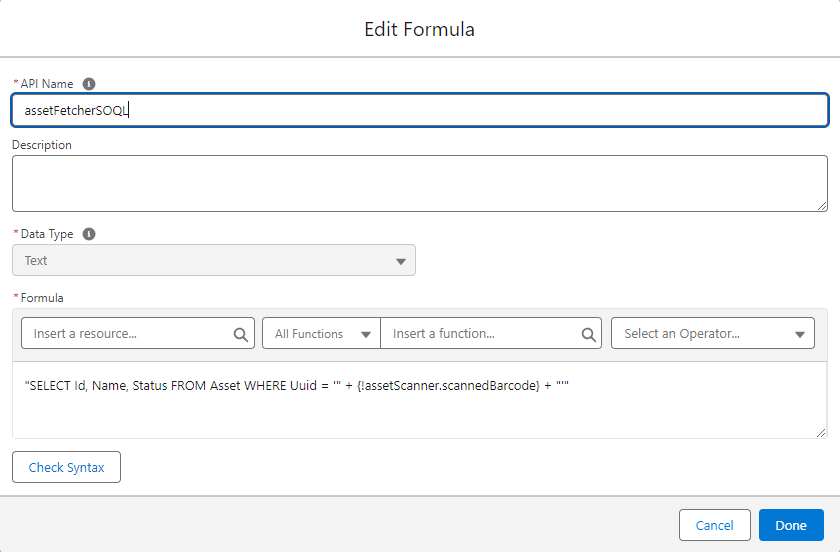
Create a new formula resource defined as:
- API Name =
assetFetcherSOQL- Data Type =
Text- Formula =
"SELECT Id, Name, Status FROM Asset WHERE Uuid = '" + {!assetScanner.scannedBarcode} + "'"
 For the data fetcher component:
- API Name = `
- Object Name =
Asset - SOQL Query String =
assetFetcherSOQL - Set Component Visibility
- When to Display Component =
All Conditions Are Met (AND) - Condition:
{!assetScanner.scannedBarcode}Is Null{!$GlobalConstant.False}
- When to Display Component =
Here’s what the final product looks like. Pretty sleek!
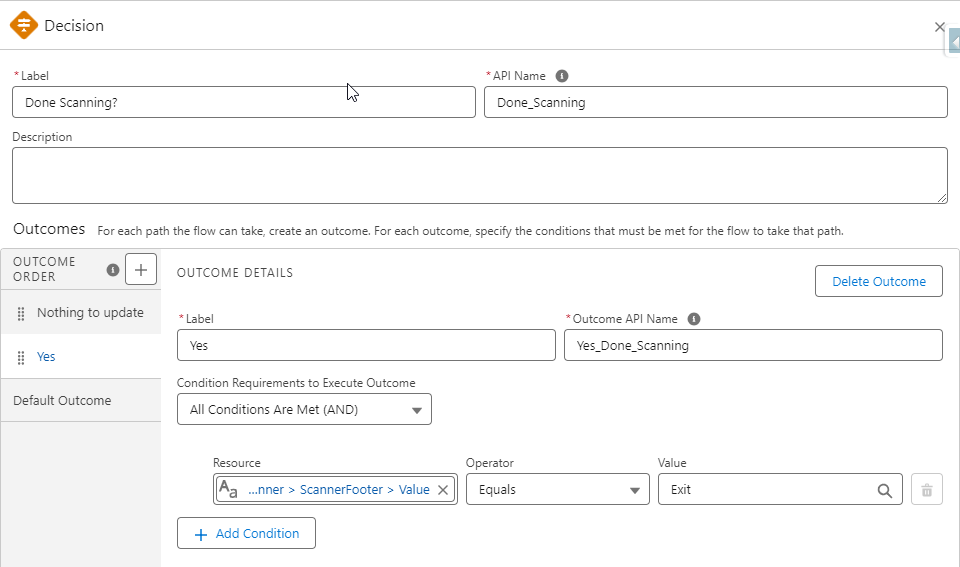
Decision Element
Let’s review the flow’s design real quick, and you’ll notice we’ve got a decision element right after the scanning screen.
We’ve created a “loop” in this flow that can only be broken when the users selects the Done Scanning option. But let’s see what happens if they select the other option, Save Update.
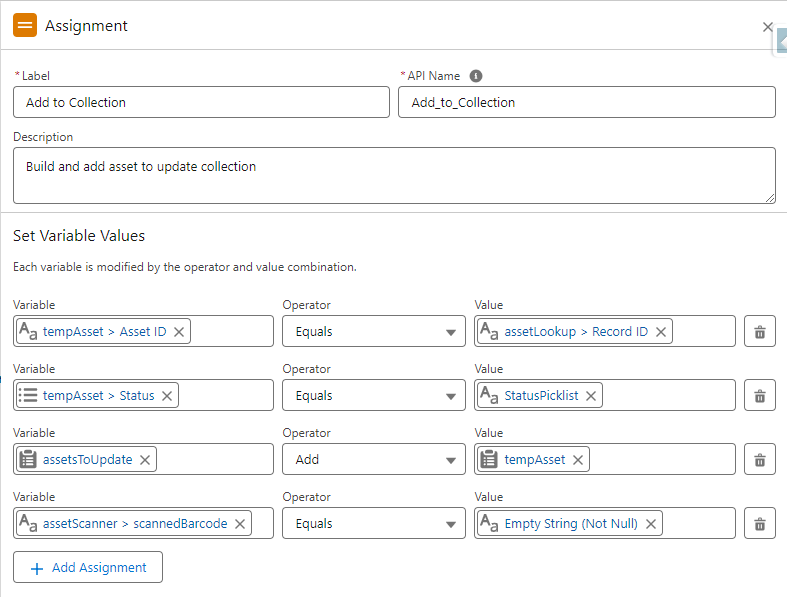
If the users selectes Save Update the flow will follow the Default Outcome of the decision, which will add the changes to a record collection.
- Using an record variable named
tempAssetfor the object type of Asset, we will assign the record id from the asset lookup,{!assetLookup.recordId}, to the temporary asset’s id,{!tempAsset.Status}. - Then using the same
tempAssetwe will assign the status based on the selected value of the picklist,{!StatusPicklist}, to the temporary asset’s status,{!tempAsset.Status}. - Then we add the
{!tempAsset}record variable to an record collection variable (again the object type is Asset) named{!assetsToUpdate}. - The final step is to clear the scanned barcode value,
{!assetScanner.scannedBarcode}, by setting it equal to an empty string,{!$GlobalConstant.EmptyString}.- 📝 This is so that when the user returns to the screen with the barcode scanner component, it’s reset and ready to use again.
After the assignment element, this path leads back to the first screen ready to scan again.
Once the user is ready to save all the records, they will select Done Scanning button and it will attempt to do the update.
The first path simply checks if there have been any saved updates. If not, it will simply inform the user that no updates were saved.

The other path will then be taken if there are saved updates.
Update Element
The flow will perform the update using the record collection variable, {!assetsToUpdate}, and then reach a confirmation screen for the user.
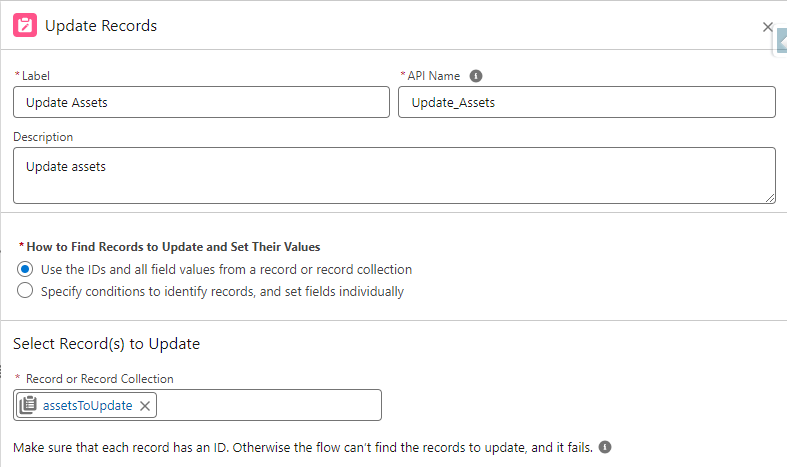
YES, I know I didn’t handle faults. This is a demo and not a final version of the flow, so it follows the “happy path” because the only values are the record id and the status which is being read by the picklist choice set. There is a small risk here, but this is only for demonstrations.
Summary
So now you’ve seen how the update to make the barcode scanner reactive allows you to put it into a screen flow and with some other components, make it a wonderful user experience to scan an asset, view and update/save changes on a form, and then move onto the next asset.
Now if others can help pin point how to get this to work on continuous scanning, that would help with ideas like adding it to a data table of items scanned.
And imagine when the Flow Action Button comes out of beta and can be used to make those updates on the same screen, reducing this down to a single screen!